Overview:
This is a simple tutorial on using Ubuntu as a software router with support for Wifi AP mode.
The goals we want to achieve are:
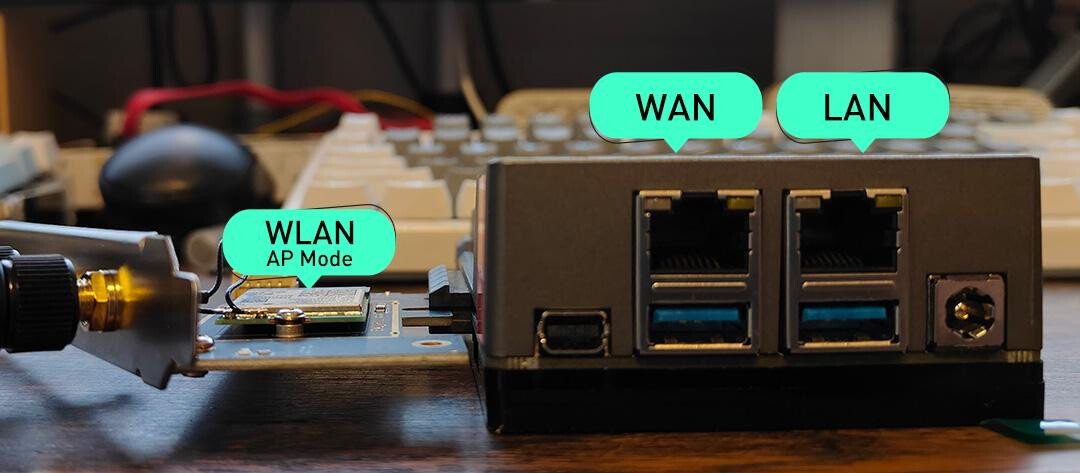
- Use the network port near the MiniDP as the WAN (Internet) port.
- Use the network port near the power supply as the LAN port, providing internet service to other devices with built-in DHCP.
- Set up Wifi in AP mode, bridging it with the LAN port and sharing the network, providing internet service to other wireless devices.
Preparation:
- 列表条目
ZimaBoard x 1
Intel AX210 WiFi 6E PCIe Card x 1
Ubuntu 22.04 Server installer usb disk x 1
Procedure:
Refer to this guide for the specific installation process:
The commands in this article are executed as root. If you are using a different user, you can switch to root or use sudo.
sudo su  #switch to root user
#[sudo] password for xxx: [input your password]

cd ~
apt-get update
apt-get -y install net-tools dnsmasq hostapd haveged bridge-utils
- Implementing Basic Routing Functionality
Enable Kernel’s Forwarding Functionality
nano /etc/sysctl.conf
# Find #net.ipv4.ip_forward = 1 and uncomment this line
net.ipv4.ip_forward = 1

# Add these configs after net.ipv4.ip_forward = 1
net.ipv4.conf.all.forwarding=1
net.ipv4.conf.default.forwarding=1
net.ipv4.conf.all.route_localnet=1
Use Ctrl + O to save and Ctrl + X to exit the editor, then apply the changes.
On macOS, use Command + O to save and Command + X to exit the editor.
sysctl -p
Configuring Network Interfaces and Bridges
First, take a look at the network port list.
ip addr
You will see the following response:
1: lo: <LOOPBACK,UP,LOWER_UP> mtu 65536 qdisc noqueue state UNKNOWN group default qlen 1000
    link/loopback 00:00:00:00:00:00 brd 00:00:00:00:00:00
    inet 127.0.0.1/8 scope host lo
       valid_lft forever preferred_lft forever
    inet6 ::1/128 scope host
       valid_lft forever preferred_lft forever
2: enp2s0: <BROADCAST,MULTICAST,UP,LOWER_UP> mtu 1500 qdisc fq_codel state UP group default qlen 1000
    link/ether 00:e0:4c:17:81:96 brd ff:ff:ff:ff:ff:ff
    inet 192.168.1.110/24 metric 100 brd 192.168.1.255 scope global dynamic enp2s0
       valid_lft 5730sec preferred_lft 5730sec
    inet6 fe80::2e0:4cff:fe17:8196/64 scope link
       valid_lft forever preferred_lft forever
3: enp3s0: <BROADCAST,MULTICAST,UP,LOWER_UP> mtu 1500 qdisc fq_codel master br0 state UP group default qlen 1000
    link/ether 00:e0:4c:17:81:97 brd ff:ff:ff:ff:ff:ff
4: wlp1s0: <BROADCAST,MULTICAST,UP,LOWER_UP> mtu 1500 qdisc noqueue master br0 state UP group default qlen 1000
    link/ether 64:d6:9a:d5:34:d7 brd ff:ff:ff:ff:ff:ff
We can see that the current enp2s0 interface (located near the MiniDP port) is the interface connected to the network, and we use it as the WAN interface. enp3s0 (located near the power port) and wlp1s0 are bridged to form the LAN network.
Ubuntu 22.04 uses netplan to manage the network.
nano /etc/netplan/00-installer-config.yaml
The specific configuration is as follows:
# This is the network config written by 'subiquity'
network:
  ethernets:
    enp2s0:
      dhcp4: true
    enp3s0:
      dhcp4: false
      dhcp6: false
      optional: true
  bridges:
    br0:
      interfaces: [enp3s0]
      dhcp4: false
      dhcp6: false
      addresses: [192.168.56.1/24]
  version: 2
-
enp2s0 serves as the WAN interface and uses DHCP to automatically obtain an IP address from the upstream router.
-
enp3s0 is to be part of the bridge. Disable DHCP functionality and set “optional” to true, indicating that the system does not need to wait for this network interface to initialize during startup. This ensures that there won’t be a long delay during startup due to not obtaining an IP address.
-
Created a bridge network called br0, while also disabling its DHCP client functionality. Specified its IP address as 192.168.56.1 (modify according to your own needs). This IP address will serve as the new gateway address.
Applying the configuration.
netplan try
netplan apply
nano /etc/default/hostapd
DAEMON_CONF="/etc/hostapd/hostapd.conf"
Create /etc/hostapd/hostapd.conf and write the following content:
nano /etc/hostapd/hostapd.conf
interface=wlp1s0                # The name of the wireless network obtained from the network list
driver=nl80211
bridge=br0                      # Add wlp1s0 to br0
ssid=YOUR-SSID                  # Your wifi ssid name
hw_mode=g
channel=7
wmm_enabled=0
macaddr_acl=0
auth_algs=1
ignore_broadcast_ssid=0
wpa=2
wpa_passphrase=YOUR-PASSPHASE    # Your wifi password
wpa_key_mgmt=WPA-PSK
wpa_pairwise=TKIP
rsn_pairwise=CCMP
To set hostapd to start on boot and start the service:
systemctl unmask hostapd
systemctl enable hostapd
systemctl start hostapd
Edit /etc/dnsmasq.conf
port=5353
interface=br0
dhcp-range=192.168.56.20,192.168.56.150,255.255.255.0,24h
dhcp-option=option:dns-server,192.168.56.1,8.8.8.8
-
Since port 53 is already occupied by the default DNS service in Ubuntu, we will use port 5353 to avoid conflicts.
-
Bind the service to the br0 network.
-
The DHCP assigned IP range is from 192.168.56.20 to 192.168.56.150 with a lease duration of 24 hours.
-
DHCP will allocate two DNS servers: 192.168.56.1 and 8.8.8.8.
Start service
systemctl restart dnsmasq
systemctl restart hostapd
Using the default UFW (Uncomplicated Firewall) in Ubuntu, first check the status of UFW.
ufw status
# The "inactive" status indicates that the firewall is closed, while "active" indicates that it is enabled.
If the firewall is closed, enable the firewall.
ufw enable
Set up allowing SSH access to the device.
ufw allow ssh
# or
ufw allow 22
Configure the client device to allow access to the DHCP service.
ufw allow 67/udp
If you need UFW to perform NAT for connections from the external interface to the internal interface, the solution is straightforward. Change the DEFAULT_FORWARD_POLICY parameter in the /etc/default/ufw file.
nano /etc/default/ufw
Modify it:
DEFAULT_FORWARD_POLICY="ACCEPT"
Set up NAT forwarding.
nano /etc/ufw/before.rules
Add the following content after ‘*filter ~ COMMIT’:
# NAT table rules
*nat
:PREROUTING ACCEPT [0:0]
:POSTROUTING ACCEPT [0:0]

# Forward traffic through enp2s0 - Change to match you out-interface
-A POSTROUTING -s 192.168.56.0/24 -o enp2s0 -j MASQUERADE

# don't delete the 'COMMIT' line or these nat table rules won't
# be processed
COMMIT
Restart the ufw service:
ufw disable && ufw enable
All the settings are now basically ready.
Test
-
Restart the device.
-
Test the wired connection: Connect a wired device to the network port near the power source and check if it can establish a connection successfully. Verify if it obtains an IP address like 192.168.56.xx and test if it can access the network properly.
-
Test the wireless connection: Scan for networks using a wireless device and check if it can detect the previously defined SSID. Connect to the network, enter the correct password, and see if it can establish a connection successfully. Verify if it obtains an IP address like 192.168.56.xx and test if it can access the network properly.
If everything works correctly, congratulations! You now have a simple WiFi router based on Ubuntu set up.